

How To Make It As A Newly Registered Architect
If you're a programmer who'south interested in Blockchain development, you lot should know something well-nigh NFTs, or Non-Fungible Tokens. Then in this commodity, nosotros'll learn about the engineering behind them so y'all can get-go building your own.
At the stop of the project, y'all will take your ain Ethereum wallet with a new NFT in it. This tutorial is beginner-friendly and does not require any prior noesis of the Ethereum network or smart contracts.
What is an NFT?
NFT stands for not-fungible token. This quote from ethereum.org explains it well:
NFTs are tokens that nosotros tin can use to represent ownership of unique items. They allow us tokenise things similar art, collectibles, even real estate. They tin can only have one official possessor at a time and they're secured by the Ethereum blockchain – no ane can alter the record of ownership or copy/paste a new NFT into existence.
What is an NFT standard or ERC-721?
The ERC-721 is the most mutual NFT standard. If your Smart Contract implements certain standardized API methods, it can be chosen an ERC-721 Not-Fungible Token Contract.
These methods are specified in the EIP-721. Open-sourced projects like OpenZeppelin have simplified the development process past implementing the nigh common ERC standards as a reusable library.
What is minting an NFT?
By minting an NFT, you publish a unique token on a blockchain. This token is an instance of your Smart Contract.
Each token has a unique tokenURI, which contains metadata of your asset in a JSON file that conforms to certain schema. The metadata is where you store information about your NFT, such equally name, epitome, description, and other attributes.
An instance of the JSON file for the "ERC721 Metadata Schema" looks like this:
{ "attributes": [ { "trait_type": "Shape", "value": "Circle" }, { "trait_type": "Mood", "value": "Distressing" } ], "description": "A sad circle.", "image": "https://i.imgur.com/Qkw9N0A.jpeg", "proper noun": "Sad Circle" } There are iii master ways to shop an NFT's metadata.
First, yous can store the information on-concatenation. In other word, you tin can extend your ERC-721 and store the metadata on the blockchain, which tin be costly.
The second method is to utilise IPFS. And the third fashion is to simply have your API return the JSON file.
The outset and second methods are normally preferred, since you cannot temper the underlying JSON file. For the scope of this project, we will opt for the third method.
For a good tutorial on using NFTs with IPFS, read this article by the Alchemy team.
What We'll Be Edifice

In this tutorial, we'll be creating and minting our own NFT. Information technology is beginner-friendly and does non require any prior knowledge of the Ethereum network or smart contracts. Still, having a good grasp on those concepts will assist y'all understand what is going on backside the scenes.
In an upcoming tutorial, we'll build a fully-functional React web app where you tin brandish and sell your NFTs.
If you are just getting started with dApp development, begin by reading through the key topics and sentinel this amazing form by Patrick Collins.
This project is intentionally written with easily understandable lawmaking and is not suitable for product usage.
Prerequisites
Metamask

We need an Ethereum address to collaborate with our Smart Contract. We will be using Metamask as our wallet. It is a complimentary virtual wallet that manages your Ethereum addresses. We will need it to send and receive transactions (read more on that hither). For instance, minting an NFT is a transaction.
Download their Chrome extension and their mobile app. We will need both every bit the Chrome extension does not display your NFTs.

Brand certain to change the network to "Ropsten Test Network" for development purposes. You will need some Eth to encompass the fees of deploying and minting your NFT. Head to the Ropsten Ethereum Faucet and enter your address. You should soon see some exam Eth in your Metamask business relationship.

Alchemy
To interact with the Ethereum Network, you lot will need to be continued to an Ethereum Node.
Running your own Node and maintaining the infrastructure is a project on its own. Luckily, in that location are nodes-as-a-service providers which host the infrastructure for y'all. In that location are many choices like Infura, BlockDaemon, and Moralis. We will be using Abracadabra as our node provider.
Caput over to their website, create an account, cull Ethereum equally your network and create your app. Cull Ropsten as your network.

On your dashboard, click "view details" on your app, then click "view cardinal". Relieve your http key somewhere as we will need that afterward.

NodeJS/NPM
We will exist using NodeJS for the project. If y'all don't have it installed, follow this simple tutorial past freeCodeCamp.
Initialize the project
In your terminal, run this command to make a new directory for your projection:
mkdir nft-project cd nft-project Now, let's make another directory, ethereum/, inside nft-project/ and initialize it with Hardhat. Hardhat is a dev tool that makes it easy to deploy and exam your Ethereum software.
mkdir ethereum cd ethereum npm init Respond the questions however you want. And so, run those commands to brand a Hardhat project:
npm install --save-dev hardhat npx hardhat You will run across this prompt:
888 888 888 888 888 888 888 888 888 888 888 888 888 888 888 8888888888 8888b. 888d888 .d88888 88888b. 8888b. 888888 888 888 "88b 888P" d88" 888 888 "88b "88b 888 888 888 .d888888 888 888 888 888 888 .d888888 888 888 888 888 888 888 Y88b 888 888 888 888 888 Y88b. 888 888 "Y888888 888 "Y88888 888 888 "Y888888 "Y888 Welcome to Hardhat v2.0.8 ? What do y'all desire to exercise? … Create a sample project ❯ Create an empty hardhat.config.js Quit Select create an empty hardhat.config.js. This will generate an empty hardhat.config.js file that we will afterward update.
For the web app, we will use Next.js to initialize a fully-functional web app. Go back to the root directory nft-project/ and initialize a boilerplate Next.js app called web:
cd .. mkdir web cd web npx create-adjacent-app@latest Your project now looks like this:
nft-project/ ethereum/ web/ Crawly! We are fix to dive into some real coding.
How to Define Our .env Variables
Remember the Alchemy key we grabbed from our exam project earlier? We will employ that along with our Metamask account's public and individual keys to interact with the blockchain.
Run the post-obit commands, brand a file called .env inside your ethereum/ directory, and install dotenv. Nosotros will apply them later.
cd .. cd ethereum bear upon .env npm install dotenv --save For your .env file, put the cardinal yous have exported from Alchemy and follow those instructions to grab your Metamask's private fundamental.
Here's your .env file:
DEV_API_URL = YOUR_ALCHEMY_KEY PRIVATE_KEY = YOUR_METAMASK_PRIVATE_KEY PUBLIC_KEY = YOUR_METAMASK_ADDRESS The Smart Contract for NFTs
Go to the ethereum/ folder and create two more directories: contracts and scripts. A simple hardhat project contains those folders.
-
contracts/contains the source files of your contracts -
scripts/contains the scripts to deploy and mint our NFTs
mkdir contracts mkdir scripts Then, install OpenZeppelin. OpenZeppelin Contract is an open-sourced library with pre-tested reusable code to make smart contract development easier.
npm install @openzeppelin/contracts Finally, nosotros will be writing the Smart Contract for our NFT. Navigate to your contracts directory and create a file titled EmotionalShapes.sol. You tin name your NFTs however you lot see fit.
The .sol extension refers to the Solidity language, which is what we will use to program our Smart Contract. We volition simply be writing 14 lines of lawmaking with Solidity, so no worries if you haven't seen it before.
Get-go with this commodity to learn more about Smart Contract languages. You lot tin also directly bound to this Solidity crook sheet which contains the main syntax.
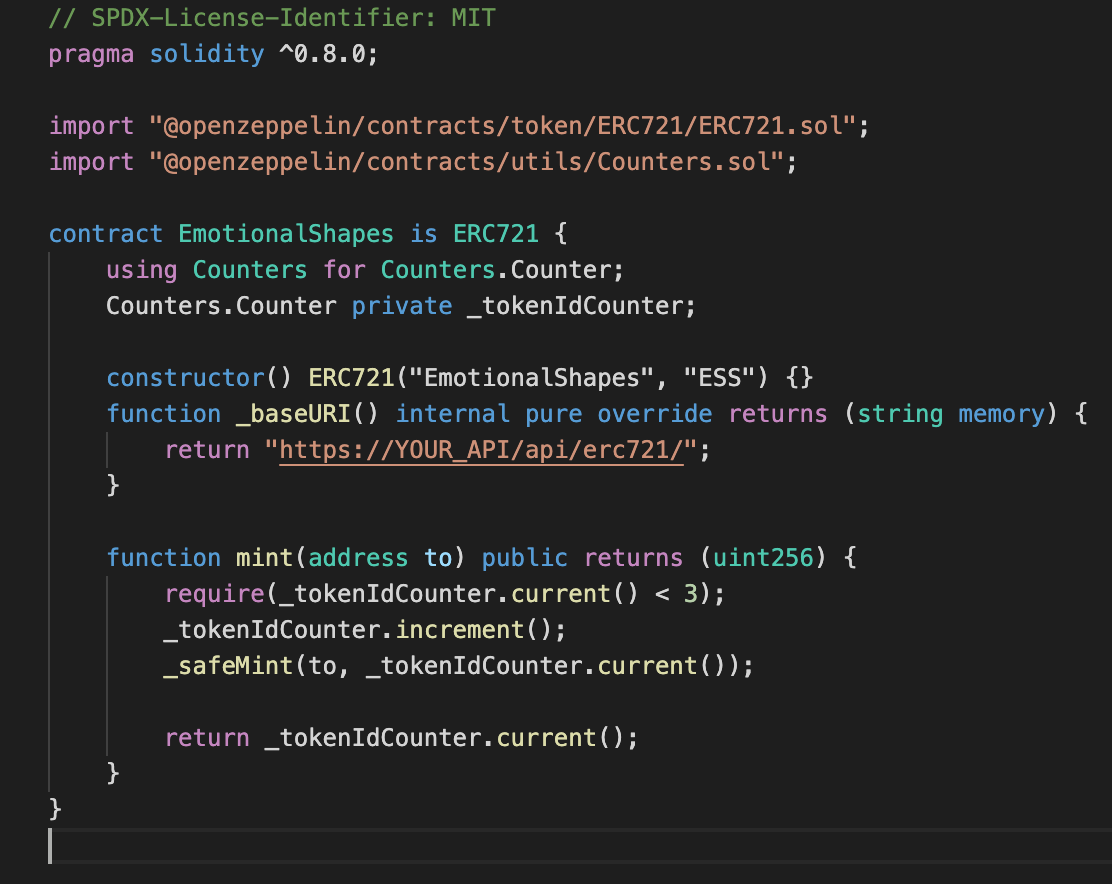
cd contracts touch EmotionalShapes.sol This is our Smart Contract:
// SPDX-License-Identifier: MIT pragma solidity ^0.8.0; import "@openzeppelin/contracts/token/ERC721/ERC721.sol"; import "@openzeppelin/contracts/utils/Counters.sol"; contract EmotionalShapes is ERC721 { using Counters for Counters.Counter; Counters.Counter private _tokenIdCounter; constructor() ERC721("EmotionalShapes", "ESS") {} part _baseURI() internal pure override returns (cord retentiveness) { return "YOUR_API_URL/api/erc721/"; } function mint(address to) public returns (uint256) { require(_tokenIdCounter.current() < 3); _tokenIdCounter.increase(); _safeMint(to, _tokenIdCounter.current()); return _tokenIdCounter.current(); } } Permit'southward go through the code and empathise what is going on.
- At the elevation of the file, we specified which OpenZeppelin module to import. We demand the ERC721 contract as it is the 'base of operations' of our Smart Contract. It has already implemented all the methods specified in EIP-721 so we can safely apply it.
- A Counter is useful to generate incremental ids for our NFTs. Nosotros named the variable
_tokenIdCounter - In the constructor, we initialized our ERC721 with its name and its symbol. I chose EmotionalShapes and ESS.
- We override the default
_baseURIoffice by returning our ain. We will go to build that in a 2d. In summary, it is the URL that will exist added as 'prefix' to all our tokenURIs. In the in a higher place example, the metadata of our NFTs volition live in a JSON file atYOUR_API_URL/api/erc721/ane. - We implement the 'mint' function. It is the function that lets you publish an instance of this Smart Contract on the blockchain. I required the
_tokenIdCountervariable to exist less than 3 as I will only create three instances of my NFT. You can remove that if you want to mint more than. - Finally, inside the mint function, nosotros increment the
_tokenIdCountervariable by ane, so our id will be 1, followed by two, followed by three. So, we call the function provided past OpenZeppelin_safeMintto publish the token.
Don't worry if y'all feel lost. You can attend a workshop led past volunteers from freeCodeCamp, where we invite devs of similar skill levels to build stuff together, including this NFT project.
The events are free and remote, so y'all can ask any questions direct. You lot tin can annals here. The seats are express so y'all volition be invited to the next available events.
As mentioned earlier, there are iii master ways of storing your tokenURI. We will exist building a simple API endpoint which resolve in our NFT'south information as JSON.
Our Next.js project gives us a handy manner to develop API routes. Get to the spider web/ folder, notice the api/ folder within the pages/ folder, and make our dynamic [id].js route in a erc721/ folder (read more about routing hither):
// web/pages/api/erc721/[id].js const metadata = { 1: { attributes: [ { trait_type: "Shape", value: "Circle", }, { trait_type: "Mood", value: "Sad", }, ], clarification: "A lamentable circle.", image: "https://i.imgur.com/Qkw9N0A.jpeg", name: "Sad Circle", }, two: { attributes: [ { trait_type: "Shape", value: "Rectangle", }, { trait_type: "Mood", value: "Aroused", }, ], description: "An angry rectangle.", image: "https://i.imgur.com/SMneO6k.jpeg", name: "Angry Rectangle", }, 3: { attributes: [ { trait_type: "Shape", value: "Triangle", }, { trait_type: "Mood", value: "Bored", }, ], description: "An bored triangle.", image: "https://i.imgur.com/hMVRFoJ.jpeg", name: "Bored Triangle", }, }; export default function handler(req, res) { res.status(200).json(metadata[req.query.id] || {}); } For the sake of this project, I made the code equally easily understandable as possible. This is definitely non suited for production (please don't use an Imgur url for your NFT). Make certain to define the metadata for all the NFTs that you intend to mint.
Now, go to the web directory, and get-go your Adjacent.js app with this command:
npm run dev Your app should be running on localhost:3000. To make certain our endpoint works, get to http://localhost:3000/api/erc721/1 and it should resolve with a JSON object of your start NFT's metadata.
Since your app is hosted locally, other apps cannot access it. Using a tool like ngrok, nosotros can betrayal our local host to a publicly accessible URL.

- Go to ngrok.com and complete the registration procedure
- Unzip the downloaded package
- In your terminal, make sure you cd into the folder where you unzipped your ngrok package
- Follow the education on your dashboard and run
./ngrok authtoken YOUR_AUTH_TOKEN 5. Then, run this command to create a tunnel to your spider web app hosted on localhost:3000
./ngrok http 3000 6. Yous are almost there! On your terminal, y'all should see something like this:
ngrok by @inconshreveable (Ctrl+C to quit) Session Status online Account YOUR_ACCOUNT (Program: Free) Version 2.iii.40 Region Us (united states) Spider web Interface http://127.0.0.i:4040 Forwarding http://YOUR_NGROK_ADDRESS -> http://localhost:3000 Forwarding https://YOUR_NGROK_ADDRESS -> http://localhost:3000 Become to YOUR_NGROK_ADDRESS/api/erc721/one to brand certain your endpoint works correctly.
How to Deploy our NFT
At present that we have done all the ground work (oof), allow'due south go back to our ethereum/ folder and get ready to deploy our NFT.
Alter the _baseURI function in your ethreum/contracts/YOUR_NFT_NAME.sol file to render your ngrok address.
// ethereum/conrtacts/EmotionalShapes.sol contract EmotionalShapes is ERC721 { ... office _baseURI() internal pure override returns (string memory) { return "https://YOUR_NGROK_ADDRESS/api/erc721/"; } ... } To deploy our NFT, we will starting time need to compile it using Hardhat. To make the process easier, nosotros volition install ethers.js.
npm install @nomiclabs/hardhat-ethers --salvage-dev Let'southward update our hardhat.config.js:
require("dotenv").config(); require("@nomiclabs/hardhat-ethers"); module.exports = { solidity: "0.8.0", defaultNetwork: "ropsten", networks: { hardhat: {}, ropsten: { url: process.env.DEV_API_URL, accounts: [`0x${process.env.PRIVATE_KEY}`], }, }, }; To learn more than almost the hardhat configuration file, take a look at their documentation. Nosotros have configured the ropsten network with our Alchemy URL and provided it with the individual key of your metamask account.
Finally, run:
npx hardhat compile This lets hardhat generate two files per compiled contract. Nosotros should see a newly created artifacts/ folder that contains your compiled contracts in the contracts/ folder. To learn more virtually how that works, read this tutorial by the Hardhat squad.
Now, let's write a script to finally deploy our NFT to the examination network. In your scripts/ folder, create a file chosen deploy.js.
// ethereum/scripts/deploy.js async function main() { const EmotionalShapes = await ethers.getContractFactory("EmotionalShapes"); const emotionalShapes = await EmotionalShapes.deploy(); console.log("EmotionalShapes deployed:", emotionalShapes.address); } main() .then(() => process.exit(0)) .catch((error) => { console.error(error); process.exit(1); }); This code is inspired by the hardhat deployment tutorial.
AContractFactoryin ethers.js is an abstraction used to deploy new smart contracts, thenEmotionalShapeshere is a factory for instances of our token contract. Callingdeploy()on aContractFactorywill start the deployment, and return aPromisethat resolves to aContract. This is the object that has a method for each of your smart contract functions.
How to view the NFT on the blockchain
Run the deployment script:
node ./scripts/deploy.js You lot should run across in your final EmotionalShapes deployed: SOME_ADDRESS. This is the address where your Smart Contract is deployed on the ropsten test network.
If you caput over to https://ropsten.etherscan.io/accost/SOME_ADDRESS, you should run into your freshly deployed NFT. Yeah! You did it!
If you are stuck somewhere in the tutorial or feeling lost, again, you can bring together our live workshops where we will build this project together in a Zoom call.
How to Mint your NFT
Now that y'all accept deployed your NFT, it's time to mint it for yourself! Create a new file called mint.js in your scripts/ binder. Nosotros will be using ethers.js to assistance us.
Start by adding the ethers.js package:
npm install --save ethers And so, populate the mint.js file:
crave("dotenv").config(); const { ethers } = require("ethers"); const contract = require("../artifacts/contracts/EmotionalShapes.sol/EmotionalShapes.json"); const contractInterface = contract.abi; // https://docs.ethers.io/v5/api/providers const provider = ethers.getDefaultProvider("ropsten", { alchemy: process.env.DEV_API_URL, }); // https://docs.ethers.io/v5/api/signer/#Wallet const wallet = new ethers.Wallet(procedure.env.PRIVATE_KEY, provider); //https://docs.ethers.io/v5/api/contract/contract const emotionalShapes = new ethers.Contract( YOUR_NFT_ADDRESS, contractInterface, wallet ); const main = () => { emotionalShapes .mint(process.env.PUBLIC_KEY) .then((transaction) => panel.log(transaction)) .catch((due east) => panel.log("something went wrong", e)); }; primary(); I have left comments to where you can find more information about the different methods. Nosotros get-go take hold of the contract's interface (ABI). From ethereum.org:
An application binary interface, or ABI, is the standard style to interact with contracts in the Ethereum ecosystem, both from outside the blockchain and for contract-to-contract interactions.
Your ABI defines how others collaborate with your contract. And then, nosotros created our provider with Abracadabra (remember about node-as-a-service). Finally, nosotros initialize our wallet with our private cardinal.
The chief() part calls the mint method in the Smart Contract we had just deployed. The mint method takes but i parameter, to, which indicate the receiver of the token. Since we are minting for ourself, we put the public address of our Metamask account.
If everything goes well, y'all should see the transaction logged in your terminal. Grab the hash property and go to https://ropsten.etherscan.io/tx/YOUR_HASH. You should see the minting transaction there!
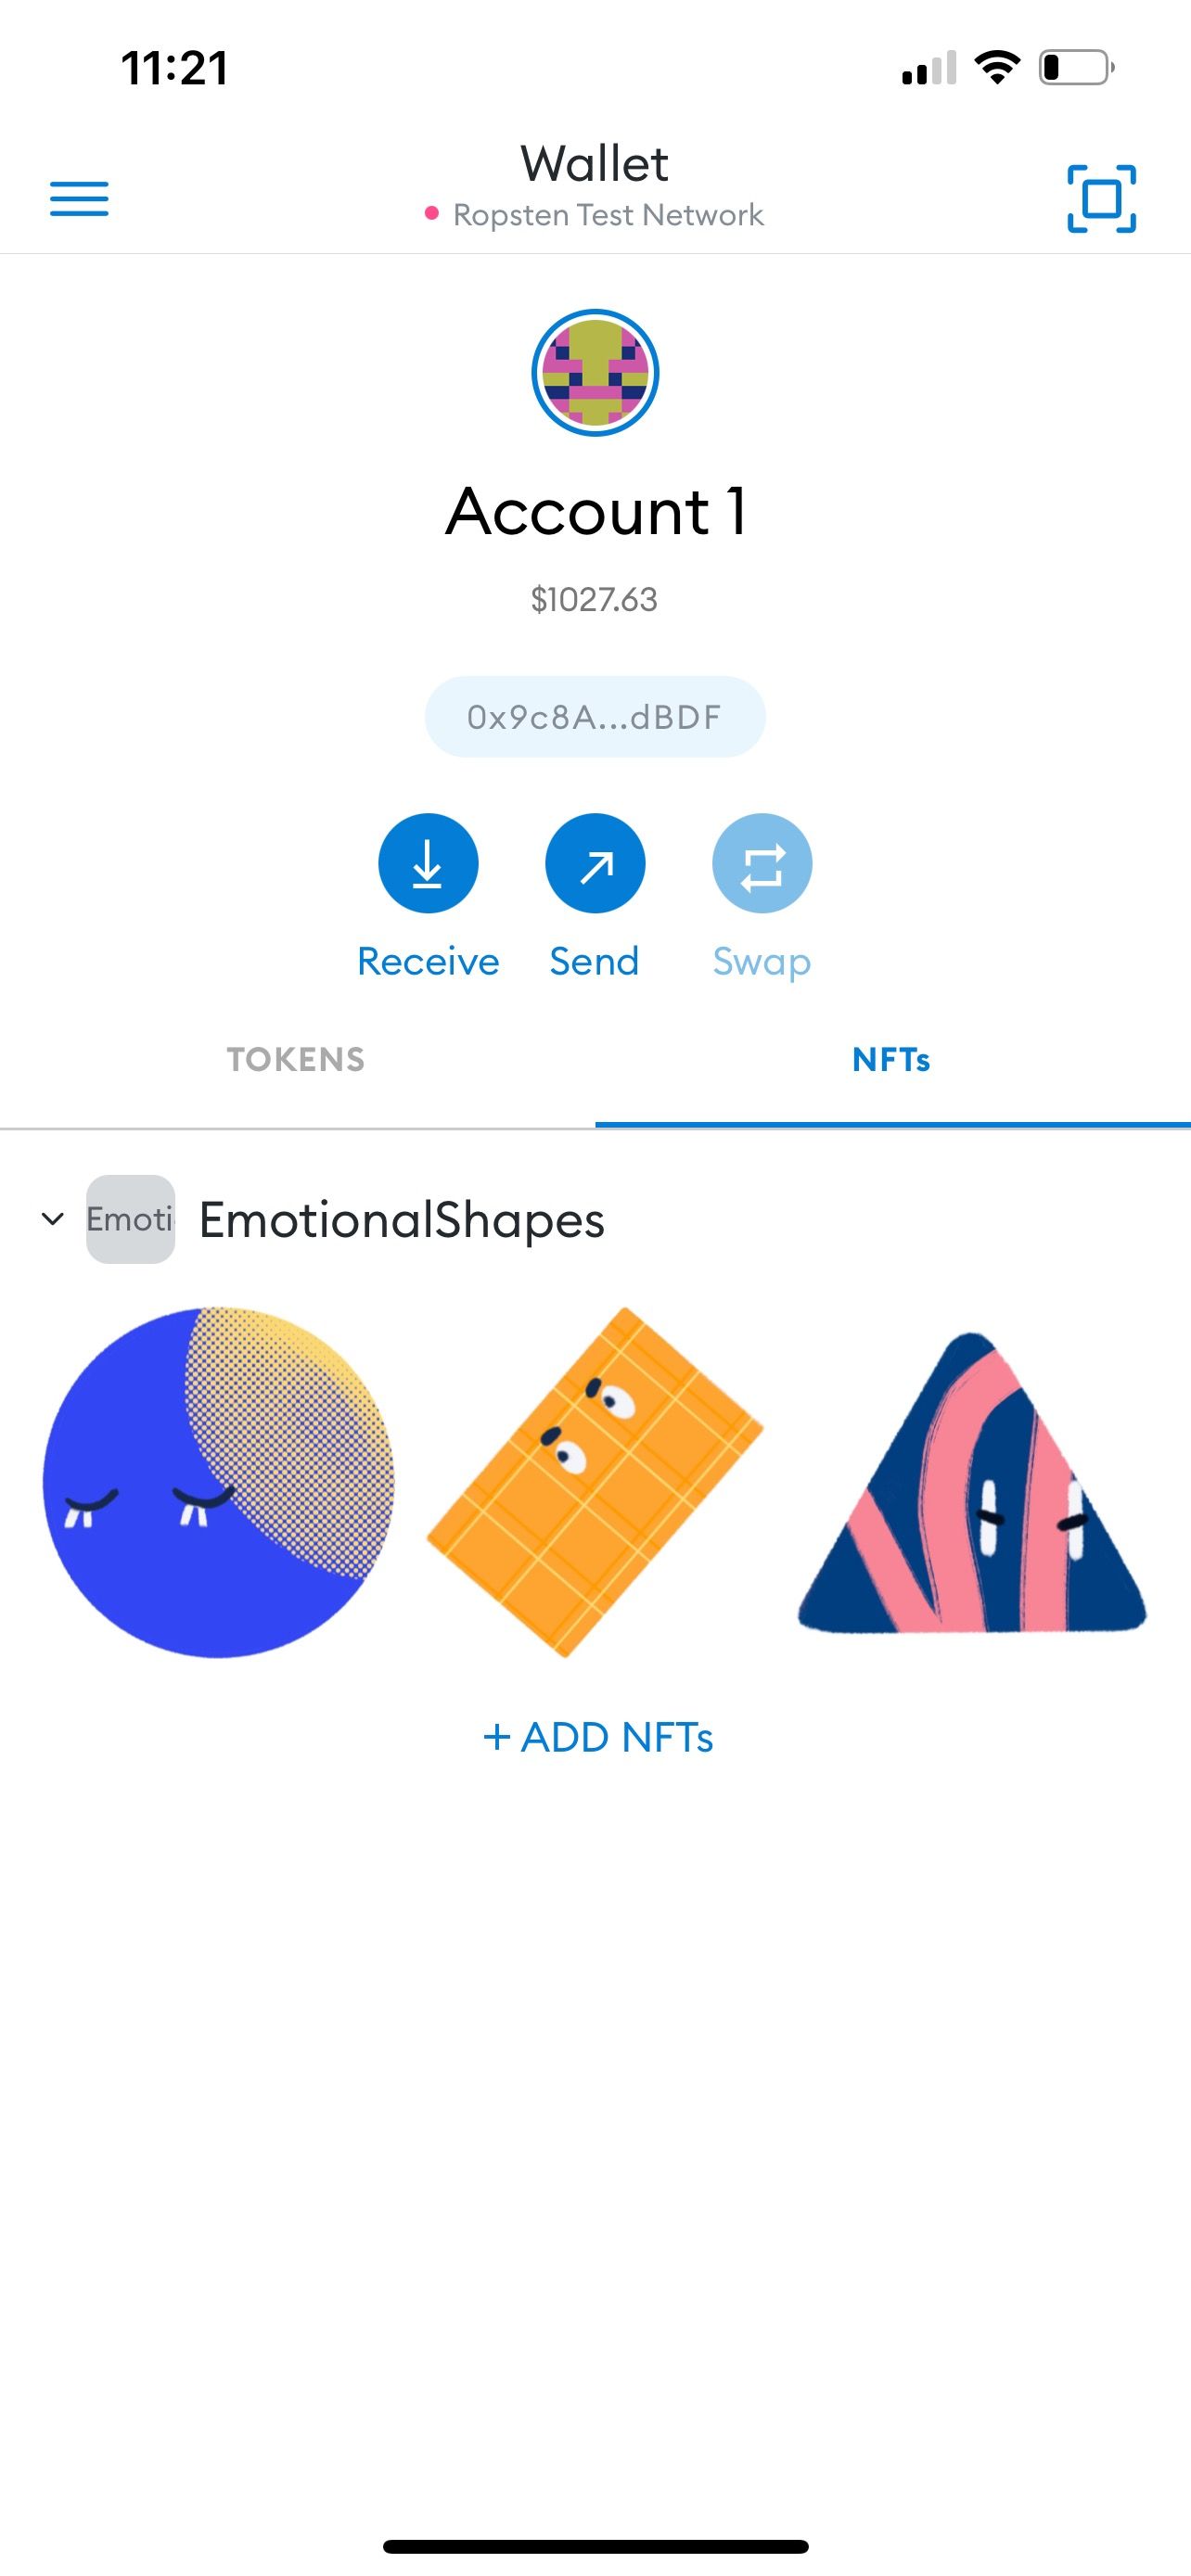
You need to start by downloading the mobile version of Metamask. Then, log into your account.
You should come across an NFTs tab forth with an add NFT button. Click on the push and enter the address of your Smart Contract along with the ids that you have minted. If you have followed the tutorial, yous should first with an id of 1.
Conclusion
Congratulations! You lot take merely minted your own NFT. In the next part of the projection, we will be edifice the forepart React app to collaborate with our contract. The terminate goal is to build a fully functional web app where yous can sell your own NFTs.
Lastly, you can join our live workshops with volunteers from freeCodeCamp where nosotros will build this project together with other developers.
The events are free for everyone across the world and invitations are sent beginning-come, offset-serve. If y'all'd like to lead the workshops, DM me on Twitter, nosotros'd love to have you! Nosotros also organize other type of events like hiring fairs and social meetups.
Let me know what you want to build. NFTs are still in its infancy and novel ideas are more than than welcome. Tin can't wait to run across what crazy idea you take!
Learn to code for free. freeCodeCamp's open up source curriculum has helped more twoscore,000 people get jobs as developers. Get started

Source: https://www.freecodecamp.org/news/how-to-make-an-nft/
Posted by: michelthres1987.blogspot.com
0 Response to "How To Make It As A Newly Registered Architect"
Post a Comment